 Road Base Options for Gravel Driveways Road Base Options for Gravel Driveways
Crushed stone and gravel driveways have become extremely popular option for areas where installing asphalt is cost prohibitive. Gravel driveways offer homeowners endless possibilities for creating a surface that reflects their taste and style. Aggregate materials are also perfect for construction projects including driveways, roads, and walkways. Another great benefit for using gravel or crushed stone, they are very easy to work with, are extremely affordable, simple to maintain, can be very unique, and will provide a very attractive appearance.
Unfortunately, because there are so many various options, homeowners have a difficult time deciding which type of stone is right for their property and their project. This guide is set up to help you choose the right materials for your future gravel or crushed stone driveway.
When you are planning your new driveway project, it's only natural that you would focus only on the surfacing material. That only makes common sense as this crushed stone is something you will look at every day. That said, you must keep in mind that it's also important to understand the other materials that you will need to complete your project.
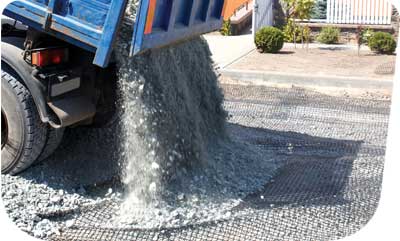
Above Photo: Road base geogrid can add extra stability to your gravel driveway as well as cellular gravel grid products.
What You Are Going To Need:
Sub-Grade Material May Be Optional:
 The sub-grade of your driveway is literally the soil located at the bottom of the excavated area for your driveway. Depending on where you live, you might discover that your soil is in really good condition and can remain as the sub-grade. On the other hand, you might discover it's in bad shape. It's loose and crumbling or has other problems. If that's the case, you will need to apply a new layer of compacted soil to serve as the foundation for your driveway. The sub-grade of your driveway is literally the soil located at the bottom of the excavated area for your driveway. Depending on where you live, you might discover that your soil is in really good condition and can remain as the sub-grade. On the other hand, you might discover it's in bad shape. It's loose and crumbling or has other problems. If that's the case, you will need to apply a new layer of compacted soil to serve as the foundation for your driveway.
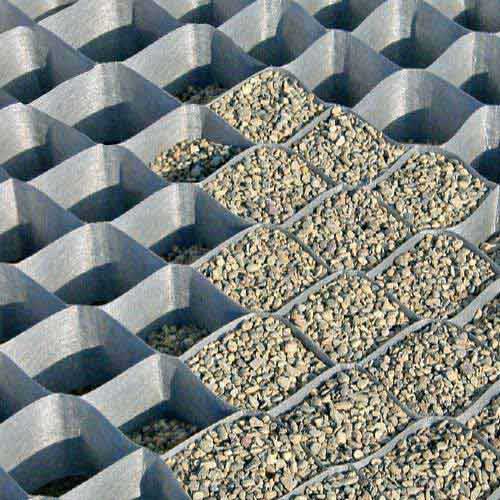
Right Photo: Dupont groundgrid provides increased stablization to a gravel driveway by reducing gravel migration.
The Sub-Base:
The sub-base is the bottom layer of crushed stone that will sit on top of the subgrade. This layer is made up of large crushed stone aggregate that will provide structural strength and integrity to your driveway.
The Base:
The base is a layer that also consists of crushed stone but slightly smaller stones than the sub-base In some cases, stone dust or stone fines will be mixed with the aggregate to reduce voids and will hold the layer in place better.
The Surfacing Material:
This is the final layer of gravel that is poured on top of the base layer and will finish the crushed stone driveway. This is the material you will pick out not just for its functional properties but also for your driveway's appearance and its aesthetic value.
Now that you know what kind of aggregate materials will be needed to construct your crushed stone driveway, it's time to think about what kind of stones are right for your driveway construction needs.
When you are looking for the materials for the base and sub-base, you will discover you can complete your project with the standard crushed stone that ranges from 1-1/2 inches to 2-1/2 inches in size. In some cases, mixing the stone with stone dust or stone fines will be the best choice. You might even consider using the quarry process (QP) for a base layer.
Without a doubt, when it comes to choosing the desired surface material, you really have to go through the many options. So let's take a closer look at each one:
Crushed Stone:
Standard crushed stone is a type of gravel that you are familiar with or in your mind's eye is what you think a crushed driveway should be. This material has been pulverized from limestone, trap rock, gneiss or granite, depending on which quarry it was taken from and then manufactured. Typically, when surfacing a residential driveway, homeowners will usually choose to work with a crushed stone that is 3/4 inches in size. This size is safe to drive on, is comfortable to walk on, and the stones will be heavy enough to remain in place.
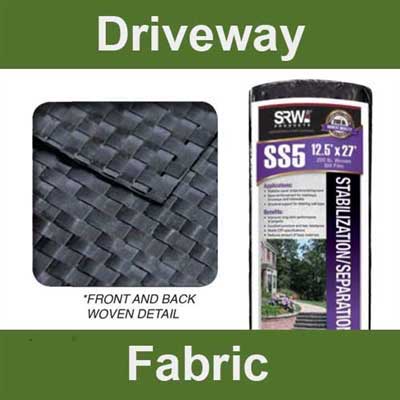 Left Photo: Driveway fabric provides stability to a gravel driveway and is constructed of a heavy-duty 200lb strength fabric material. Alternatively, a heavy weight non woven geotextile fabric (8 oz +) can also be used as an underlayment for a gravel driveway. Left Photo: Driveway fabric provides stability to a gravel driveway and is constructed of a heavy-duty 200lb strength fabric material. Alternatively, a heavy weight non woven geotextile fabric (8 oz +) can also be used as an underlayment for a gravel driveway.
Washed Clean Stone:
Washed clean stone is very much like the standard crushed stone in nature and composition. The big difference between the two is washed “clean” stone! This stone is processed to remove all stone dust or stone fines and other unwanted debris that might be in with the stone in its original crushed form. For those who are concerned about the purity and integrity of the stone will probably go for a washed clean stone. If this is your choice, you want to work with washed clean stone that is 1/4 inches or 3/8 inches in size. This is the perfect size for driving on, walking on, and for excellent drainage.
Pea Gravel:
Pea gravel has become very popular over the past few years as a crushed stone driveway material. The reason, pea gravel is a very smooth, rounded surface that is easy to drive and walk on. Another reason, the stones come in an array of colors including tan, blue, white, brown, and rust. The combination of pea gravel's texture and the beautiful colors, make this material extremely popular! Pea gravel works perfectly for any kind of residence from rural to city, classic to tradition, or modern to chic.
White Marble Chips:
White marble chips is a really nice option for your driveway. The chips are white or off-white in color with gray streaks. The stones have a “shimmering” quality that adds sparkle while reflecting the sunlight away from the surface. This is an excellent material for deflecting heat away from certain areas of your property. White marble chips are easy to work with and to maintain.
Quarry Process:
Even though quarry process is often used as a base, it is also an excellent option as a surface for your crushed stone driveway because it creates a semi-permanent surface. It is a careful mix of crushed stone and stone dust to compact the surface and hold it in place. It will provide you with a unique and sophisticated appearance and will be very low maintenance.
Calculating What You Need:
Once you know what materials you want to use, you must figure out how much of each material to buy. If math is not your strong point, not to worry. You can use a crushed stone calculator that will do the work for you. Just measure the length and width of your driveway area and what the depth of each layer will be (sub-base, base, and surface).
Keep in mind, each layer should be around 4 inches to 6 inches in depth equalling a total depth of 12 inches to 18 inches. Enter these figures into the corresponding fields of the materials calculator for each layer.
You will be told how much sub-base, base, and surface materials you are going to need in both cubic tons and in cubic yards. That said, if your driveway is irregular in shape such as curved, circular, winding, you probably should get with a professional for the materials calculations.
Purchasing Your Materials:
All of the materials listed above can typically be purchased from a local rock yard. In addition to the rock they may be able to offer you some installation guidance or refer you to a professional who specializes in gravel driveways.
 What Is The Best Stripping Sealant Method? What Is The Best Stripping Sealant Method?
Many researchers and professionals in the concrete industry are often asked similar questions such as the best approach for stripping sealants and the best products on the market that will do the best job. So, in this post, we are going to address those questions. Before you can decide what would be the best way to remove a sealant from concrete, you have to understand what kind of sealant you are removing.
As all sealants are not alike, it is strongly believed that polyurethanes and epoxies are much thicker and the best choices. That said, they also take longer to remove where thinner acrylic products work much faster.
The are two methods commonly used for stripping an old sealant are chemical and mechanical.
Chemical strippers break down the polymer structure of the sealant. The chemicals destroy the sealant by turning it into a sludge.
The Mechanical approach for removing sealants requires equipment to grind or blast off the sealant. The most common mechanical approaches are bead blasting, scarifying, grinding, and shot-blasting. Keep in mind, if using the mechanical method, you must be very careful not to damage the substrate below. You should try a softer shot or beads such as finely ground corn husks or seed hulls.
Without a doubt, the most popular and effective approach is using a chemical stripper. This is strongly advised for decorative concrete. You want to maintain the color and profile of the concrete which is extremely important. Chemical strippers have changed drastically over the years, providing more environmentally friendly products. The development of new chemical strippers is safer for the environment, including soy-based strippers or citrus-based strippers. These new strippers use natural compounds and oils to break down the sealant and are a great deal safer.
 There are aggressive chemical strippers that contain methylene chloride that work very quickly. While these strippers have been successfully used for many years for removing paints and coatings, they are highly volatile and potentially dangerous to the environment and those working with the products. There are aggressive chemical strippers that contain methylene chloride that work very quickly. While these strippers have been successfully used for many years for removing paints and coatings, they are highly volatile and potentially dangerous to the environment and those working with the products.
In many cases, it really depends on the time you are allotting to finish the project vs safety and environmentally friendliness.
The entire process of stripping sealants from concrete will take a good deal of time while keeping the product damp. Chemical strippers only work when they are active and therefore many come in a gel form. Gels are excellent for keeping the stripper damp for a longer period of time.
Natural products work much slower and therefore it's a real challenge to keep the stripper damp. A good tip for keeping the product wet, cover the stripper with a damp cotton sheet. A thin bed sheet will keep the stripper moist and will absorb the dissolved sealant for removal.
This step might have to be repeated depending on the kind of sealant, the kind of stripper, and the surface you are working with. Without a doubt, stamped concrete with textures and grooves is the most difficult to work with. Once the sealant has dissolved, you will have to perform a really good cleaning afterward, even if the bed sheet has pulled up the dissolved sealant.
You might decide to remove the sludge with a high-pressure warm water wash followed by a cleaning with soap and water to remove any remaining debris. Once washed, you should perform a thorough rinsing and then give it plenty of time to dry out. Your concrete must be thoroughly dry before applying a new coat of sealant.
|