 Geotextile Filter Fabric Geotextile Filter Fabric
One of the most common uses of geotextile filter fabric is in french drains. Porous in construction, this fabric does an excellent job at keeping debris from the drainage pipe while allowing stormwater to pass through.
Building A French Drain
Preparation & Planning:
1. Before building a French Drain, you must find out if there will be any safety issues in the area of the drain. Look for underground cables, pipes, and any other underground installations that could put you in harm's way when you are digging your trench.
Contact your municipal and/or public agencies to find out if the area is safe for installing your French Drain. If you are in the U.S. call 811 known as the “Call Before You Dig” Hotline. You will be connected to someone who can help you out.
• Once you have been given the green light, it's time to plan out your drain's route. Your route must be 3-feet away from all walls and fences. Avoid posts, shrubs, and the roots of trees.
• You must also know the source of the water you will be draining, the velocity of the water flow, and if the water is contaminated or dangerous.
2. Secondly, you should know if there are any zoning or runoff situations. Some cities and/or towns have regulations whether you are allowed to build or dig on your property. Contact your local city or county officials so you can work together and get your project done.
It might be irritating to have to go through city, county, or government officials to get permission to build on your own property, but if you stay patient and remain polite you will probably get what you need to get the project done. If you develop a good relationship with these agencies, you will get a great deal further than battling with them.
• Dealing with your local agencies might seem insane in order to dig for a small project but that's the way it is. So, make sure you get the OK, and you understand the rules and regulations that are required in your neighborhood before you start planning anything!
• Also, know if your French Drain will cause any issues for your neighbors, including the runoff of the groundwater. Keep in mind, if you direct this water onto a neighbors property, it could lead to a lawsuit.
• Your French Drain should runoff into an unused area of land that is away from any buildings and ideally has sandy soil for the water to move through easily.
 3. When planning out for your drain, find a downhill slope. This will allow for the water to drain away from the problem area easily. 3. When planning out for your drain, find a downhill slope. This will allow for the water to drain away from the problem area easily.
• If you do not have a natural slope, you can create one by digging just a little deeper as you move along your trench. It is highly recommended that you have a 1% grade for your French Drain in order to work properly. This means you should have a one-foot drop for every 100-feet or 1-inch every 10-feet of the run for proper drainage.
• You should incorporate a landscaping paint to mark off the path for your trench line. Then use some stakes along the path, and a string level to measure the incline from one end of the trench to the other.
• If you are unable to find the right pitch for your drain, you should hire someone, like a surveyor, to do it for you. This is very important because otherwise, your drain is not going to work properly. Therefore, if you have any doubt, get someone else on board to ensure you have your trench completed correctly.
• Keep in mind, the depth and grade do not have to be perfect but you want to make sure you do not have areas within the ditch where water will pool.
4. Now it's time to collect all your tools and needed supplies:
• Get a roll of water-absorbent landscaping fabric to keep your drain pipe clean to avoid clogging caused by elements entering into the pipeline such as roots, soil, and silt.
• You may prefer to purchase a perforated pipe that has a fabric sock wrapped around it.
• Purchase a perforated drain. The diameter will depend on how serious your drainage problem is and the size of your trench. You could decide to get a flexible drain pipe instead or a rigid PVC drain pipe which might be more expensive but is stronger and easier to clean out or unclog. Ensure the pipe is large enough to carry all the water flow along the route.
• Purchase washed drainage gravel. How many bags will depend on the size of your drain. You can use an online gravel calculator to get a good idea how much you will need based on the depth and width of your future trench. Some trenches might need more than gravel by the bag. In that case, contact gravel and sand companies and ask about their delivery charges and time if large amounts of gravel and/or rock are going to be required.
• Your Tools:
You can rent a trenching tool or hire a backhoe operator. Ensure the backhoe will be able to cut a trench that is deep and wide enough for your pipe. Keep in mind, walk-behind trenches will only cut 4 to 6-inch wide trenches. If you plan on doing this manually, you will need a spade or hoe for digging.
Building Your French Drain:
1. Digging the trench is not complicated but it will take a good deal of work. Get friends, family members, and/or neighbors to help you out. You could offer them food during breaks and after the trench is completed.
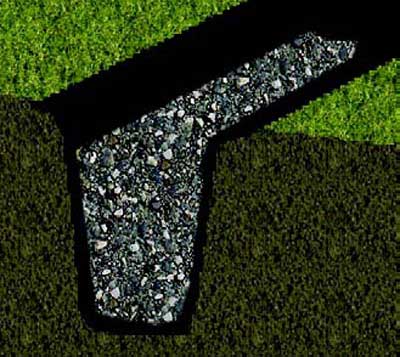
• The depth and width of your trench will depend on how serious your drainage situation is and the digging tools you are using. Rule of thumb, most French Drains are around 6-inches wide and 18 to 24-inches deep.
• If you prefer to use a trenching tool, you will be able to cut a wider trench for serious drainage issues and will cut the time of digging in half. Keep in mind, you will have to pay for the rental and will need to purchase more gravel for a larger trench.
Trenching machines can be very difficult to operate and control and are very dangerous. If you do not know how to operate one, hire someone who does or use a backhoe. If you are using a trenching machine, make sure no one is near the chain while it is being operated.
The same can be said about backhoes. You should hire a backhoe operator to cut your trench because these machines are very wide while cutting deeper trenches. This will entail the cost of both labor and rental charges.
From time to time, check the depth of your trench to ensure it is progressively sloping downward.
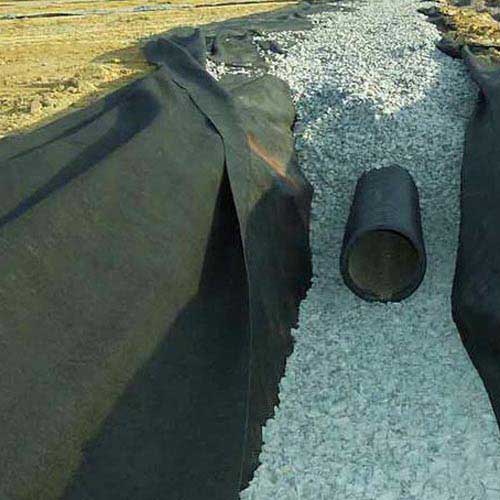
 2. Once you have finished the trench, line the trench with professional-grade non woven geotextile fabric. Keep in mind this fabric must be water-absorbent. Alternatively, in some situations the ultimate goal is to simply shuttle water away from an area with the minimum amount absorbing into the ground along the way. In these situations a thick waterproof liner such as are used to control bamboo can be used. Keep in mind that in this type of installation you will be relying on water entering the trench from the top and not from the sides. This is typically the most effective in controlling surge water runoff during period of heavy rains. 2. Once you have finished the trench, line the trench with professional-grade non woven geotextile fabric. Keep in mind this fabric must be water-absorbent. Alternatively, in some situations the ultimate goal is to simply shuttle water away from an area with the minimum amount absorbing into the ground along the way. In these situations a thick waterproof liner such as are used to control bamboo can be used. Keep in mind that in this type of installation you will be relying on water entering the trench from the top and not from the sides. This is typically the most effective in controlling surge water runoff during period of heavy rains.
• You must leave at least 10-inches or 25.4 cm of excess fabric on both sides of the trench, though more than that is recommended. This fabric can be trimmed back later on and the fabric will be pulled down when you fill your trench with rock. You must have enough fabric on either side of the trench so you can wrap it over the drain rock in order to prevent contamination or clogging up your pipe.
• Using either pins or nails, make sure to tack back the excessive fabric temporarily.
3. Now it's time to add the gravel. Shovel in approximately 2 to 3-inches or 5.1 to 7.6 cm of gravel along the bottom of the trench and on top of the landscaping fabric.
4. Lay down the perforated drain pipe into the trench on top of the gravel. Be sure the drain holes are facing downward for better drainage.
5. Place more gravel over the pipe until you reach a distance of 3 to 5-inches or 7.6 to 12.7 cm between the top of the trench and the gravel.
• Now it's time to unpin the fabric and lay it over the gravel. This will prevent debris from getting into the drain but will allow water to filter through.
6. Now you can fill the rest of the trench with the removed soil. Now finish the trench in any way that pleases you:
• You can place sod on top, reseed with grass, or place down a layer of large decorative stones. In some cases, people have added a curve to their drain pipe to give the appearance of an intentional design.
|